diesel heater

jon and michie

Well-known member
Joined
28 Dec 2014
Messages
1,458
Visit site
Right as there has been much debate on this subject that seems endless and is like marmite either a branded make or unknown Chinese version - I thought I would post my install that I planned over lockdown period and researched before jumping in.
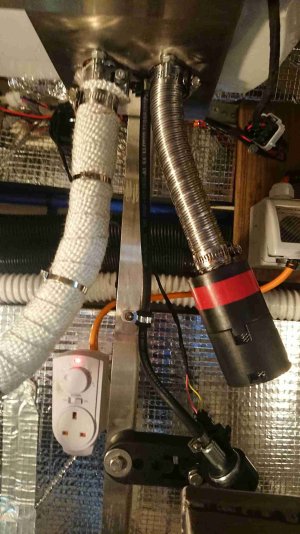
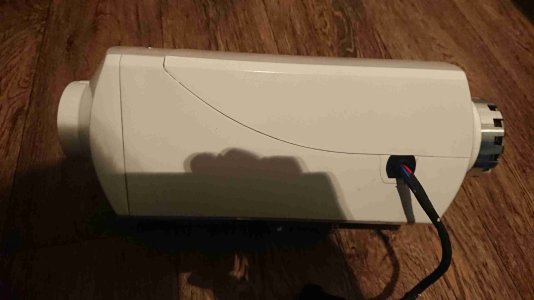
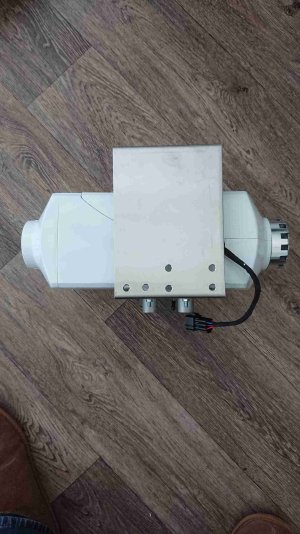
As a sort of foreward to this post This is a Chinese heater that I bought on ebay for £89 and I purposely got it in a aluminium casing was installed in such a way that if it ever failed all that would be required is to just remove the heater unit and install the new one

Here goes

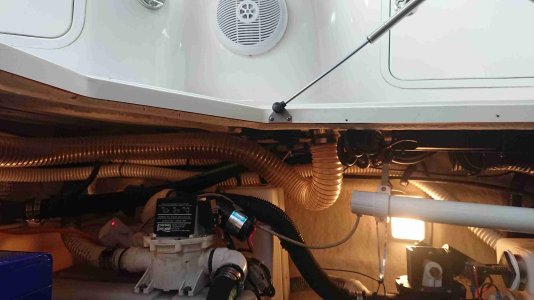
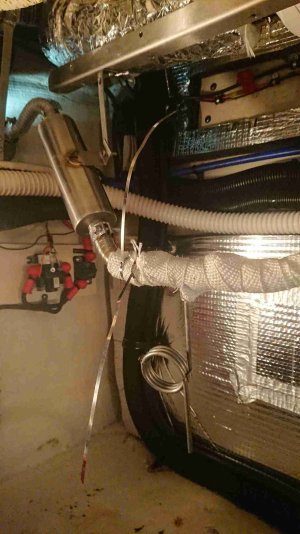
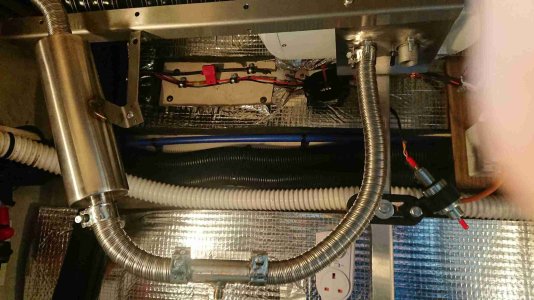
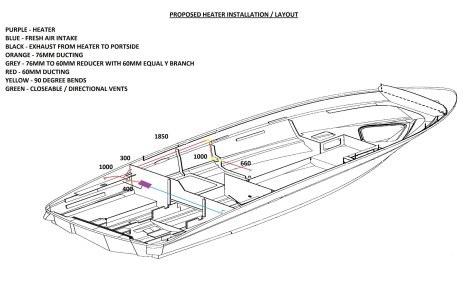
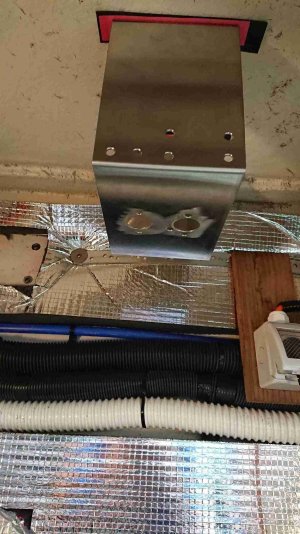
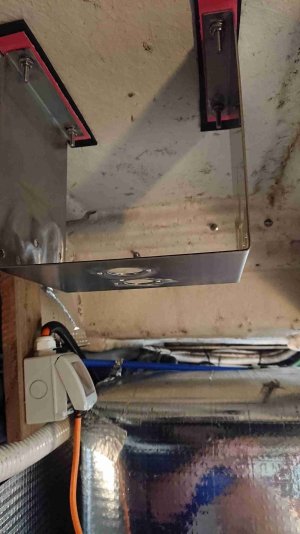
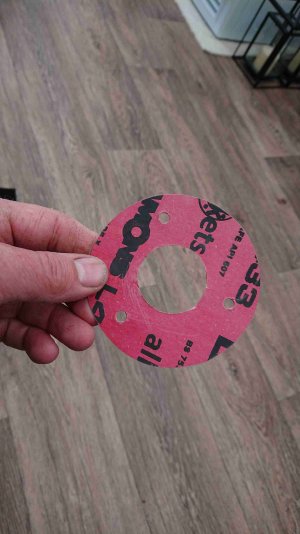
Here was part of my planning with ducting measurements - Because of the space the heater had to be suspended - This was done using high temperature gasket paper to mount the custom bracket (which I had 2 lying around) This was to stop any transfer of any heat to the above GRP.

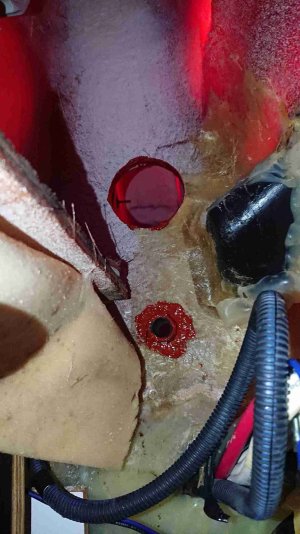
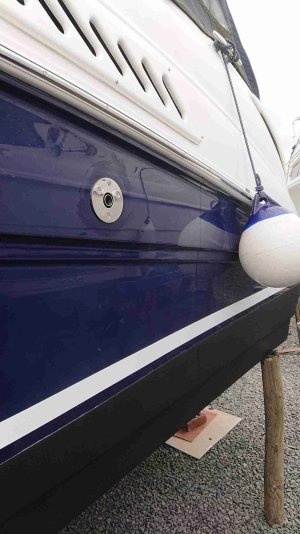
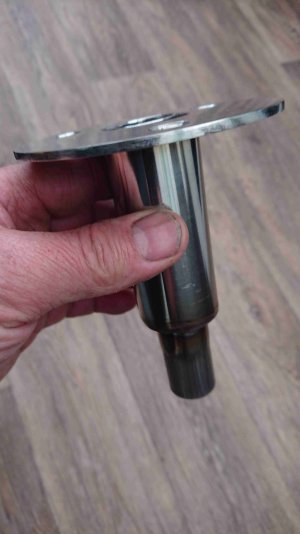
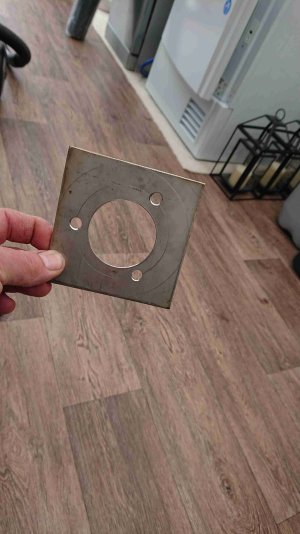
The Hull Skin fitting was fitted again with High Temp gasket paper and I fabbed up a backing plate for it to be bolted to - the fitting was well above the water line and had high temp sealant added to protect the outside grp from water ingress.

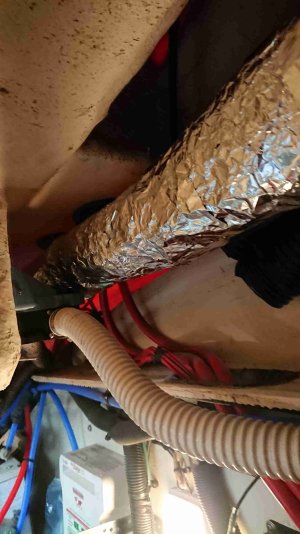
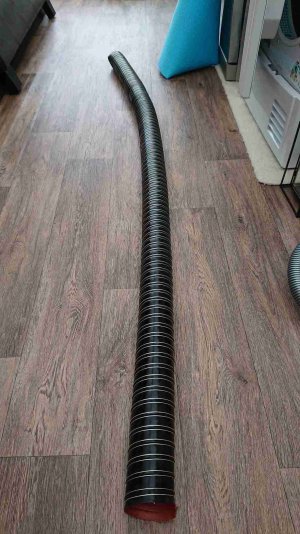
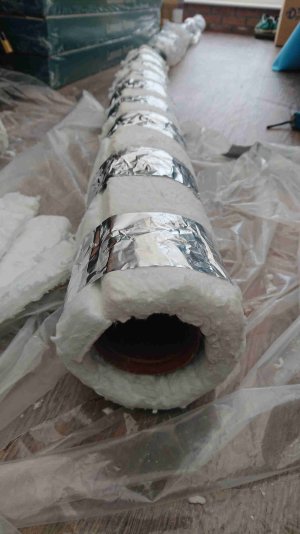
The Ducting was 76mm diameter (the planned drawing says to be reduced but I stayed with the one size) 2 ply silicone which could take up to 260 degrees C - the Ducting insulation I made up from High teperature insulation rated at something like 2000 degrees C
 

Attachments

  • layout of ducting.jpg
    layout of ducting.jpg
    193.4 KB · Views: 72
  • DSC_1705_4_11zon.jpg
    DSC_1705_4_11zon.jpg
    171 KB · Views: 69
  • DSC_1711_5_11zon.jpg
    DSC_1711_5_11zon.jpg
    190 KB · Views: 58
  • Bracket Installed 2_2_11zon.jpg
    Bracket Installed 2_2_11zon.jpg
    188.9 KB · Views: 60
  • Bracket Installed 1_1_11zon.jpg
    Bracket Installed 1_1_11zon.jpg
    137.5 KB · Views: 57
  • Through hull fitting 2_5_11zon.jpg
    Through hull fitting 2_5_11zon.jpg
    169.2 KB · Views: 56
  • exhaust fitting Gasket 1_11_11zon.jpg
    exhaust fitting Gasket 1_11_11zon.jpg
    188.5 KB · Views: 56
  • Exhaust fitting backing plate_10_11zon.jpg
    Exhaust fitting backing plate_10_11zon.jpg
    180.7 KB · Views: 54
  • Ducting_8_11zon.jpg
    Ducting_8_11zon.jpg
    154.7 KB · Views: 57
  • Duct  Insulation_9_11zon.jpg
    Duct Insulation_9_11zon.jpg
    167.1 KB · Views: 62
Last edited:

jon and michie

Well-known member
Joined
28 Dec 2014
Messages
1,458
Visit site
I used a length of Webasto exhaust tubing along with a Marine Silencer which was wrapped in exhaust wrap and stainless steel tie wraps used.
On the Exhaust pipe I also fitted a condensate pipe which was filled with water to prevent any gases coming out into the engine bay.

The Fuel pipe was to bs /iso 7840 which I believe is the accepted standard for inspection.

Hull Fitting installed (missed on the previous post) on the Port Side

For the Air intake (heating side) I used a piece of ducting that fitted up to an existing vent on the Stb side - this meant fresh air would be used and not any exhaust gas from the port exhaust and any smells from the engine bay holding tank etc etc.

The heat ducting was on a Y piece one went off to an permanent opened vent under the cockpit table (good for being outside in winter)
the other one went off in to the main cabin which could be closed off to prevent cold wind entering when the heater wasnt being used.

2 Holes were drilled and the edges of the holes had high temperature sealant added before the ducting and the electric cables were fitted - once these were fitted more sealant was added to make good any gaps.


On the Exhaust set pic you will noticed a fuse link - for the Power the positive + Bus bar was behind the fuse board and a higher Spec length of wire was used to connect to the Accessory breaker switch that was of the same amperage as the fuse - from the switch the same high spec cable was used to go through the bulkhead to the fuse link.
The negative busbar was close by and again a higher spec cable was used
This is because the heater's main cables were thin and over a long distance could cause issues with heat etc - hence they were only a small length.

The Controller - I bought an Extension cable which was of good quality from a chap on a facebook group - This means that if the controller or the heater failed these could be changed out at either end without pulling the interior apart.

The Fuel was served by a Stainless steel Tank that I fabbed up which had a vacuum vent installed along with an isolation tap (unfortunately I cant find any pics at the moment)
Just to add the Exhaust I used Miklor Stainless steel exhaust clamps.

Everything like the Ducting was secured
I had 3 Co monitors - one in the engine bay - the fixed boat one in the cabin and a portable one next to the cabins outlet - None of which has alarmed

Epilogue - The whole cost approx £550 and it was worth it
Yes the Heater has served me well with no issues
For a safe Boat install it is going to cost you more than the heater itself - because the supplied kit from a Chinese version is really not suitable.
As I said earlier and cannot stress enough do your research any diesel heater regardless of brand is lethal if installed wrong
 

Attachments

  • LCD Controller 2_4_11zon.jpg
    LCD Controller 2_4_11zon.jpg
    132.1 KB · Views: 60
  • Heater Switched Installed_2_11zon.jpg
    Heater Switched Installed_2_11zon.jpg
    184.9 KB · Views: 64
  • Bulk head Holes_3_11zon.jpg
    Bulk head Holes_3_11zon.jpg
    161.5 KB · Views: 58
  • Underseat Ducting 1_6_11zon.jpg
    Underseat Ducting 1_6_11zon.jpg
    164.6 KB · Views: 51
  • Cockpit ducting 1_7_11zon.jpg
    Cockpit ducting 1_7_11zon.jpg
    157.4 KB · Views: 55
  • Intake 3_3_11zon.jpg
    Intake 3_3_11zon.jpg
    165.7 KB · Views: 56
  • Exhaust hull fitting location outside_12_11zon.jpg
    Exhaust hull fitting location outside_12_11zon.jpg
    160.2 KB · Views: 59
  • DSC_1747_7_11zon.jpg
    DSC_1747_7_11zon.jpg
    185.8 KB · Views: 63
  • DSC_1746_6_11zon.jpg
    DSC_1746_6_11zon.jpg
    162.6 KB · Views: 59
  • exhaust set up_13_11zon.jpg
    exhaust set up_13_11zon.jpg
    185.9 KB · Views: 60
  • exhaust set up_1_11zon.jpg
    exhaust set up_1_11zon.jpg
    185.9 KB · Views: 69
Last edited:

Rappey

Well-known member
Joined
13 Dec 2019
Messages
4,414
Visit site
Very nicely done and i see you've also fitted an exhaust drain. Did you cut the plug off the controller to get the cable through the bulkhead?
I made a hole big enough for the plug and then fitted the controller over the hole, thinking it would be easier if i ever needed to change it.
 

jon and michie

Well-known member
Joined
28 Dec 2014
Messages
1,458
Visit site
@Rappey - Thank you I do have a lot more photo's from when I did it - during my researching I downloaded videos etc
and found this one useful to remove the pins from the plug top tip - Take a photo so the wires go back in the correct position
The controller doesn't cover the bulkhead Hole that was used for the extension cable and the positive power wire to the heater from the breaker switch

Where the display was mounted it only needed something like a 6mm hole - which I put a rubber grommet on the cable before replacing the pins back in the plug - if you go to my last post and click on the lcd controller pic and enlarge you can see it
 
Last edited:

Rappey

Well-known member
Joined
13 Dec 2019
Messages
4,414
Visit site
I never thought about removing the pins. When i bought my heater i also bought another glowplug, motherboard and controler as it seems whenever you have spares that part never goes wrong. 5 years later its all still working.
 

jon and michie

Well-known member
Joined
28 Dec 2014
Messages
1,458
Visit site
@Rappey - I didnt fancy drilling a big hole near the controller so I just searched youtube and got the best videos and kept them#
the "barnsley boater" Video channel is a good one as he explains like the bss cert etc etc
as an add on - I put on a dvd fault codes etc so that if anything happened all I had to do is put it in the tv and reference it
 

jon and michie

Well-known member
Joined
28 Dec 2014
Messages
1,458
Visit site
Thanks for posting those pictures. It is a job I'm planning to do this month.

Interesting comments about hole sizing I'm planning to cut the plug off and replace them with spade connectors.
it is fairly easy to remove the pins from the plug as per video above - just need to go back in the right place - any questions just ask
 

steveeasy

Well-known member
Joined
12 Aug 2014
Messages
2,101
Visit site
Hi
Nice install. Could you be specific about the insulation type and cost you used. Seams not too much is arround at present and some suppliers of heaters may have left the market.

Steveeasy
 

jon and michie

Well-known member
Joined
28 Dec 2014
Messages
1,458
Visit site
Hi
Nice install. Could you be specific about the insulation type and cost you used. Seams not too much is arround at present and some suppliers of heaters may have left the market.

Steveeasy
Bear with me I may still have a break down in costs somewhere in the house.

The Insulation I actually got from work (oil rig) but I had this in mind which is just as good Ceramic Fibre Blanket | Heat Resistant Insulation Materials | VITCAS
with Sainsburys extra strong kitchen foil and taped it up with Aluminum foil tape from Toolstation - its good enough for central heating flues.

Because of a real tight space in the cabin there was an area that I had to buy webasto insulation socks 3 was required which put the cost up and doesn't keep the heat in as good as my made up one.

Screwfix for the stainless steel jubilee clamps for the ducting

For the heat ducting https://www.autosiliconehoses.com/s...ng-performance-automotive-black-blue-red.html
and also for the cold air intake (not combustion side) PU Polyurethane Ducting - Flexible Hose

Butler technic near Lincoln for the Exhaust pipe

For the condensate pipe - I got the instrument pipe fitter to make mine from 1/4 stainless pipe and got a exhaust joiner pipe from ebay - drilled a hole and welded a swagelock fitting but you can get these already done.

90 degree bends - vent - Y pieces etc from ebay they are good enough just dont put a T or Y section straight after the heater it must have around 700mm minimum length of ducting or it will melt.

The heavy duty wiring for the positive and negative busbars I got from ebay

The fuel hose stamped 7840 I got from a hose company in Northumberland

Miklor clamps for the Exhaust I got from ebay the company is located near lincoln.

The accessory breaker switch for the fuse board was a carling in keeping with the other switches I got from a company based in Sherburn in Elmet near York

The heater Bracket and support angles I got made up at a local fab shop (i still have I bracket Spare if anyone is interested) cost me around £40 -£50

The marine silencer and Hull Skin fitting - Again an ebay shop basd in the uk (southern marine I think the name was silencer was about £40

This is off the top of my head - if I find my costings sheet (boat now sold and moved house) I will re edit this post.

Jon
 
Last edited:

jon and michie

Well-known member
Joined
28 Dec 2014
Messages
1,458
Visit site
Looks good - only comment re switch is make sure you only switch the heat off from the control panel and do not remove power till heater has cooled down, otherwise you may damage the controller motherboard.
Totally correct - The reason I fitted a breaker switch on the main board was to totally isolate it when not in use - there has been stories in the past where heaters have suddenly just switched on - (which I wouldn't want that happening whilst I am away from the boat ie gone down the pub for a couple of hours) - How true I dont know but having total control of it makes sense to me plus if anything did happen ie fire - I could just switch it off instantly.
 
Top